Let’s Encrypt is a free, automated, and open certificate authority (CA), run for the public’s benefit. It is a service provided by the Internet Security Research Group (ISRG).
Let’s Encrypt is what I will use to give my Home Assistant an SSL certificate. But not via their website, instead via a plugin called Nginx Proxy Manager.
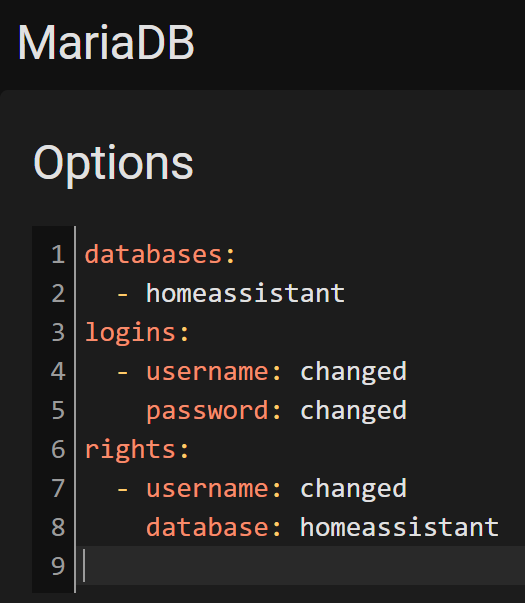
But for the Nginx Proxy Manager to work I need to install the MariaDB. This is a dependency for Nginx Proxy Manager.

In Home Assistant click on “Supervisor” and then “Add-on Store”.
Under “Official add-ons” look for “MariaDB” and click on it.
Click on “INSTALL” and when the installation is complete click on “Configuration”.
Here I have to set up the users and passwords.
Where it says changed, I have changed the value.
I return to the start page by clicking on “Info”.
Click on “START” and then go over to “Log” and see if there are any error messages.
If there are no error messages, MariaDB is up and running.
I got the following warning in the log: “[Warning] ‘proxies_priv’ entry ‘@% root @ core-mariadb’ ignored in –skip-name-resolve mode.”
After I stopped MariaDB and then in configuration changed under Network from Disabled to 3306 and then restarted, the warning was gone. Do not know why the warning existed the first time I started. But it works now and I do not complain.
Now that MariaDB is up and running:
Tip: It may be a good idea to activate Watchdog if it is not already active.
In Home Assistant click on “Supervisor” and then “Add-on Store”.
Under “Home Assistant Community Add-ons” find “Nginx Proxy Manager” and click it.
But wait a minute… I can not see any “Home Assistant Community Add-ons”. Why? 🙁
After a bit of searching on Google, I found this page: https://addons.community/
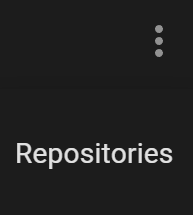
To add community add-ons go to “Supervisor” and then “Add-on Store” in the upper right corner click on the three vertical dots and then on “Repositories” in the list.
Then type “https://github.com/hassio-addons/repository” and click “Add” then “Close”.
In Home Assistant click on “Supervisor” and then “Add-on Store”.
Under “Home Assistant Community Add-ons” (Yes, now it is there 🙂 ) find “Nginx Proxy Manager” and click it.
Click on “INSTALL” and when it is done installing start the add-on by clicking “START”.
Again go over to “Log” and see if there are any error messages.
If there are no error messages, Nginx Proxy Manager is up and running.
Activate Watchdog if it is not already activated.
Click on “OPEN WEB UI”.
The first time I log in to Nginx Proxy Manager, the user is “admin@example.com” and the password is “changeme”. Immediately after I log in, there is a request to change the password and user.
I use an e-mail address as my username and choose a password.
Click on “Hosts” in the menu and then “Proxy Hosts”.
Fill in the following:
Domain Names: The domain name I have on DuckDNS.
Sheme: http
Forward Hostname / IP: 192.168.1.190
Forward Port: 8123
Activate “Websocket Support”.
I skip “Custom locations” and click on “SSL” instead.
Under “SSL Certificate” I select “Request a new SSL Certificate” and click on “Save”.
Opens a web browser and enters the duckdns address.
Gets “400: Bad Request”.
OK, search Google for solutions and find this.
Which leads me to look in Configuration / Server Controls / Logs where I find the following:
A request from a reverse proxy was received from 172.30.33.4, but your HTTP integration is not set-up for reverse proxies.
I add the following to configuration.yaml
http:
use_x_forwarded_for: true
# these are the HA docker container network addresses
# one of which is the Nginx proxy Manager.
trusted_proxies:
– 172.30.33.0/24
ip_ban_enabled: true
login_attempts_threshold: 5
I restart Home Assistant to activate the new changes in the configuration file.
As I understand it the Nginx proxy Manager is running i a docker container and the ip to that container can change during a restart of home assistant and the scope of ip-addresses it uses is from 172.30.33.0 to 172.30.33.24.
I try again to open a webbrowser and enters the duckdns domain again.

No luck 🙁
Http seems to work but not https. I remind myself that I added port forward for http (port 80) in my router but have not added https (port 443) to the router.
For some reason I look in the configuration of the Nginx Proxy Manager / Network
I find the folowing:
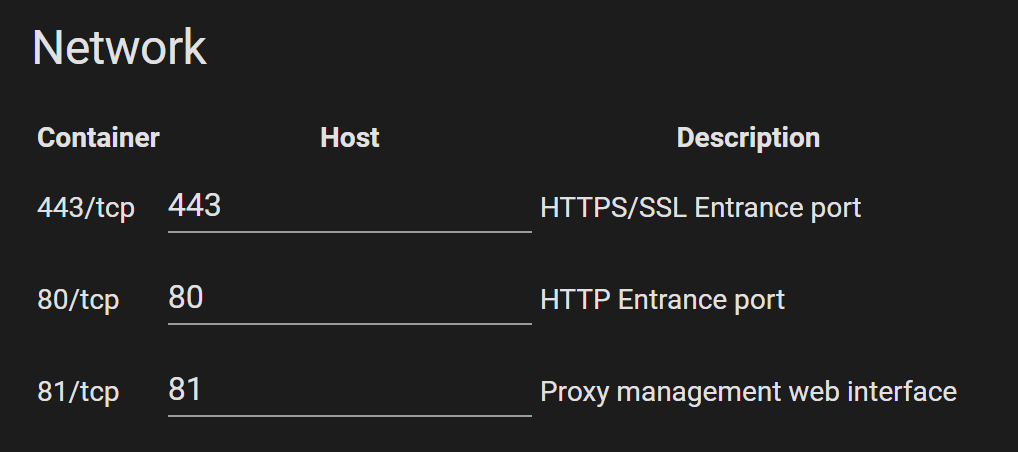
Maybe all these ports needs to be added?
In the router I have not set upp port forwarding for port 443 and port 81.
So i do that now.
In the router I add 2 port forwards:
- Original port: 443
Protocol: both TCP and UDP
Forward-to address: 192.168.1.190
Forward-to port: 443
Description: https - Original port: 81
Protocol: both TCP and UDP
Forward-to address: 192.168.1.190
Forward-to port: 81
Description: nginix proxy
Now I try again to open a web browser and enters the duckdns domain again.
This time I am rewarded with a beautiful login screen 🙂
Ohh, and I did not find proxy errors or warnings in the log.